ViewTech Keeps Their Clients Informed With Video Borescope Updates and Informational Videos
Our only business is borescopes, which makes us the industry leaders in borescope sales and service.
VJ-4 Folder Setup Instruction & Tutorial Video
ViewTech Borescopes VJ-4 Video Borescope – Folder Setup Instruction & Tutorial Video
ViewTech Borescopes VJ-4 Video Borescope – Annotation & Image Markup on YouTube
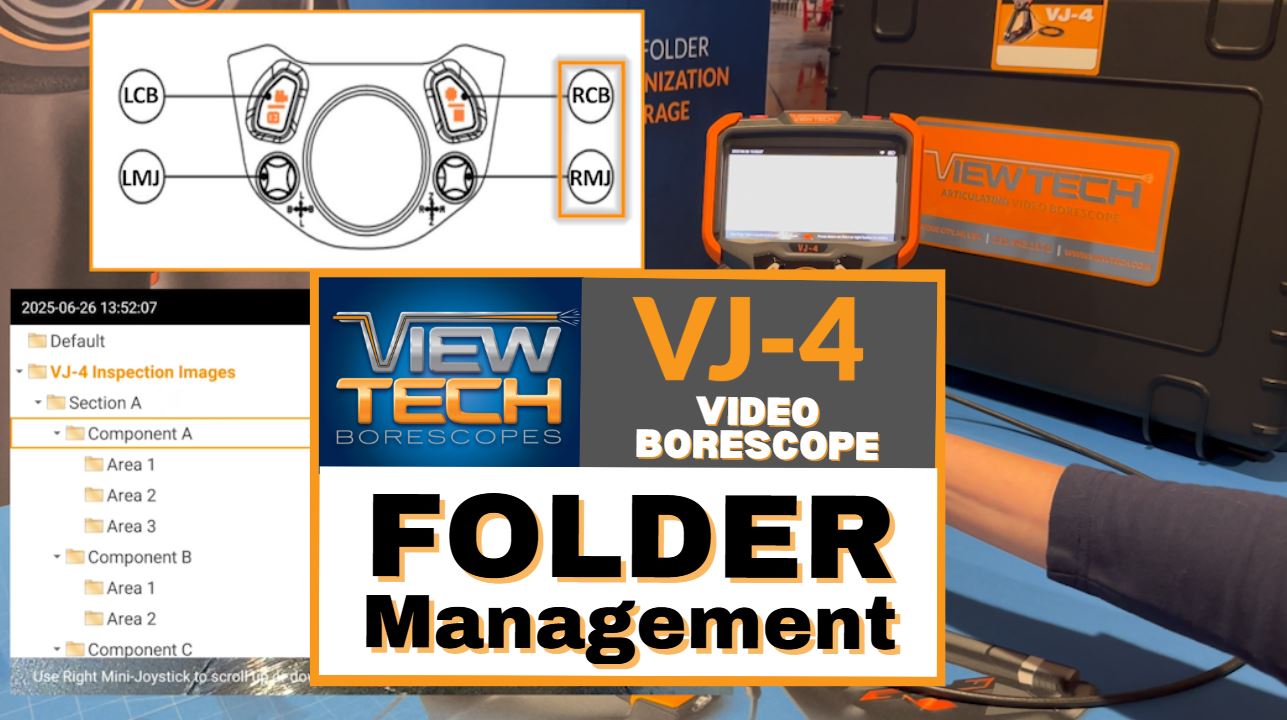
While utilizing your ViewTech VJ4 video borescope, the folder management system allows you to effortlessly organize your inspection images and videos. This video will demonstrate how to utilize fast folder select. Set a folder as active along with how to create, add, duplicate, and delete both folders and subfolders.
First, navigate to the system settings menu. Locate fast folder select and turn the setting on. For this example, the folder path will be displayed on the live image screen. To begin, there are two ways to enter fast folder select. First, you can tap the red chevron arrow to make the folder list visible and again to hide the folder list. Users can also press the left mini joystick to access fast folder select. Once visible, use the right mini joystick to toggle up or down to select a folder as active. Press down on the right mini joystick or right control button to change the active folder.
Now, with the active folder set, the inspection image captured will be saved within this folder. We repeat these steps, pressing the left mini joystick, toggling the right mini joystick, and pressing down on the right mini joystick or right control button. Another option is available to change the active folder. To begin from live image mode, press and hold the right control button to access the folder management system. Notice that each folder displays two sets of numbers. The top number represents images saved in the folder and the bottom number represents videos saved in the folder. When a blue arrow is visible, the active folder is located within that folder structure. Toggle and press the right mini joystick to locate the active folder indicated with a green check mark. To select the next active folder, tap or touch the folder, which will then display a green check mark. With the folder set to active, press the left control button to return to live image mode and capture your inspection image.
Now, repeat the steps. Press and hold the right control button. Toggle and press the right mini joystick and then select the next folder as active and return to live image mode. A quick tip, it may be easier to create your desired folder structure on a computer. Transfer this folder structure to the VJ4 SD card. Then insert the SD card into the SD card slot located on the side of your VJ4 base unit display monitor. Now to add a new folder, tap or use the left mini joystick to toggle then enter create new folder. Input the desired folder name and then select okay or press the right control button to create the folder. To duplicate a folder structure, use the left mini joystick to toggle to then enter folders and select duplicate folder. Note, when selecting duplicate folder, only the folders are duplicated and not the images or videos saved within. To rename a folder, select rename and enter the desired folder name. Users can easily remove a folder and all of its contents by selecting delete. Note files cannot be restored after being deleted. Finally, the option is available to make a folder active. Selecting make active folder will now display the desired folder as active.
The best way to experience the new VJ4 video borescope is with our free enhanced demo program. Call to speak with one of our knowledgeable video borescope experts. We will help find the best borescope for your inspection needs. You will quickly realize why ViewTech Borescopes is the number one seller of video borescopes in North America.
Demo Heading


Success Story
See the VJ-4 in Action
Meet our team and test drive our borescopes at upcoming tradeshows, conferences, events and symposiums.

Over 15 Years of Experience
The ViewTech Borescopes team was established in 2008 with the goal of bringing affordable, high-quality video borescopes to the market.
Request a Free Demo Unit
Check the box in the form below and one of our representatives will arrange a free demo unit.

Call Us at 231-943-1171
– Or –
Fill out the form below and one of our representatives will contact you.
