Our only business is borescopes
Which makes us the industry leaders in borescope sales and service.

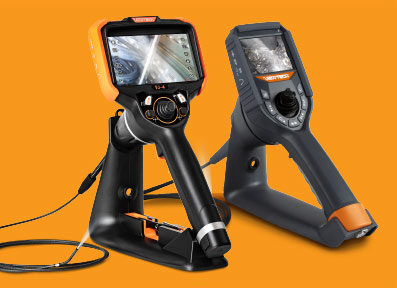
VJ-3 Operations – ViewTech Borescopes
The basic key features and operations that users will need to know will be demonstrated as follows on both a VJ-3 and VJ-3a video borescope. The easiest way to differentiate a VJ-3A from the VJ-3, is the VJ-3A will be listed as part of the model number on the back of the borescope and menu options will be displayed on the LCD screen. While the borescopes are similar, several functions vary slightly.
– To turn the video borescope on or off, press and hold the power on/off button
– The joystick controls articulation of the tip. The 2.2mm borescope features 2-way articulation, while all remaining borescopes we offer feature full 360-degree articulation.
– To adjust the lighting with the VJ-3 use the brightness control button… to adjust the lighting with the VJ-3a press up or down key to access the LED brightness setting and then the left or right adjustment key to reduce or increase the brightness of the lighting
– To switch between still photo, video and playback mode with the VJ-3 press the Live Camera/Video/Image Preview button… with the VJ-3a press the Return/Photo/Image Playback/Switch button
– With the VJ-3, to capture an inspection photo, while the borescope is in camera mode, press the trigger button under the handle grip or the camera / video button…. To record a video, while in video mode, press the trigger button under the handle grip or the camera/video button to both start or stop a video recording. To review your images and videos on the VJ-3, press the Live Camera / Video / Image Preview Button
– With the VJ-3a, to capture an inspection photo, while the borescope is in camera mode, press the trigger button under the handle grip or the camera / video button…. To record a video, while in video mode, press the trigger button under the handle grip or the camera/video button to both start or stop a video recording. To review your images and videos on the VJ-3A, press the Return / Photo / Image Playback / Switch Button. Inspection images will display first, by pressing the button again, you are able to review inspection videos.
– If you are operating a VJ-3 dual camera, to switch between the front-facing and 90-degree camera, press the menu key to select camera switch and then press the menu key again to switch to the 90-degree camera. The same process is utilized to revert to the forward-facing camera.
– With the VJ-3A dual camera, press the up-menu key to access the left function menu. Next, select the camera switch option to toggle between the Forward View and Side View Camera options. An FV or SV will be displayed, allowing you to see which camera angle is operating.
– To remove images from the SD card… With the provided ViewTech SD Card Reader and SD card, insert the SD card into the SD card reader and connect the USB portion to your laptop or PC. The computer should always detect the SD card files, allowing you to review inspection images and videos.
– You are also able to use the included Micro USB cable to connect the video borescope directly to a laptop or PC. After connecting the borescope to the computer, power on the unit to review inspection images and videos. Note: this will also charge the video borescope’s battery.
Demo Heading


Success Story
See the VJ-4 in Action
Meet our team and test drive our borescopes at upcoming tradeshows, conferences, events and symposiums.

Over 15 Years of Experience
The ViewTech Borescopes team was established in 2008 with the goal of bringing affordable, high-quality video borescopes to the market.
Request a Free Demo Unit
Check the box in the form below and one of our representatives will arrange a free demo unit.

Call Us at 231-943-1171
– Or –
Fill out the form below and one of our representatives will contact you.
